- Prep Time :
15 minutes - Cook Time :
35 minutes - Servings :
6 – 8
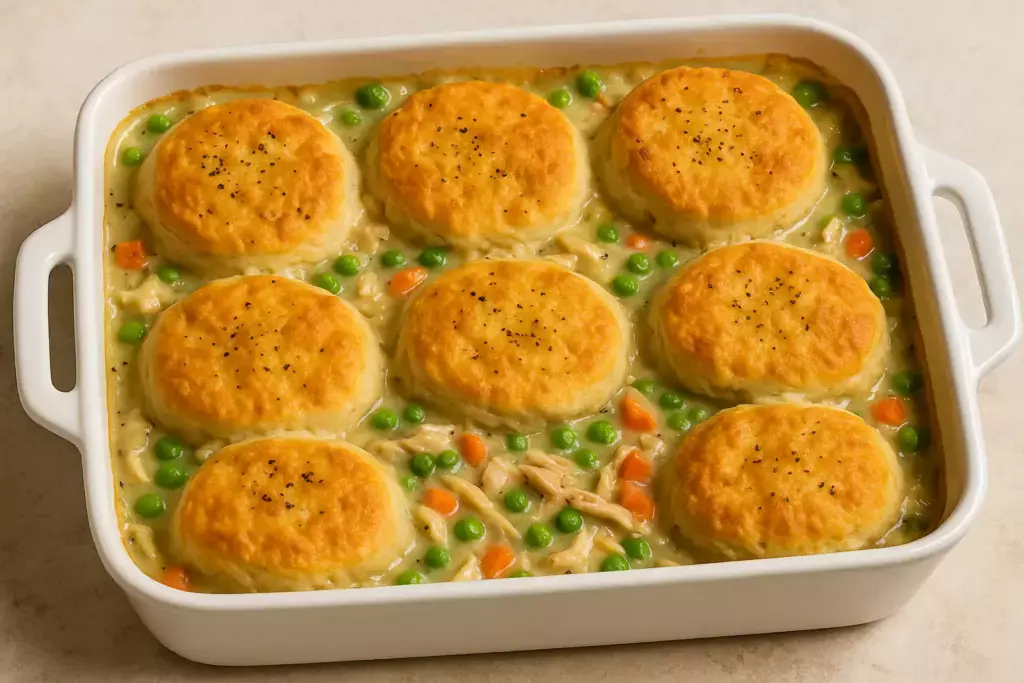
Craving the kind of comfort that warms you from the inside out? This Best Chicken Pot Pie Casserole is the creamy, cozy, easy dinner you’ll crave again and again. If you’ve ever wanted a Best Chicken Pot Pie Casserole that delivers perfect flavor and texture every time, this recipe is exactly what you need. Tender chicken, sweet peas, carrots, and a velvety sauce bake beneath a golden biscuit topping, giving you a Best Chicken Pot Pie Casserole that tastes like a warm hug in every bite.
This Best Chicken Pot Pie Casserole is simple enough for busy weeknights yet satisfying enough for weekend comfort meals. With minimal prep and maximum flavor, you’ll love how easily this Best Chicken Pot Pie Casserole fits into your dinner rotation.
Table of Contents
Table of Contents
Why You’ll Love This Best Chicken Pot Pie Casserole
- Ultra-creamy and comforting: A silky homemade sauce makes this Best Chicken Pot Pie Casserole rich and flavorful without canned soup.
- Weeknight-friendly: Using cooked shredded chicken and refrigerated biscuit dough cuts prep time, making the Best Chicken Pot Pie Casserole ideal for busy nights.
- One-pan ease: Cook the filling in a skillet, bake everything in a 9×13 dish, and enjoy a Best Chicken Pot Pie Casserole with easy cleanup.
- Family-approved: Familiar classic flavors make this Best Chicken Pot Pie Casserole a guaranteed hit with kids and adults.
- Adaptable: Customize your Best Chicken Pot Pie Casserole with extra veggies, rotisserie chicken, or dairy-free/gluten-free swaps.
What You Need for the Best Chicken Pot Pie Casserole
To make this Best Chicken Pot Pie Casserole, gather a few simple tools:
- Large 12-inch skillet or sauté pan
- Whisk for a smooth creamy base
- 9×13-inch baking dish
- Sharp knife and cutting board
- Measuring cups and spoons
- Oven preheated to 400°F (200°C)
Think classic chicken pot pie flavor but simplified into a casserole format. The creamy filling for this Best Chicken Pot Pie Casserole comes together in one skillet, then gets topped with biscuits and baked until bubbly and golden. Every spoonful of this Best Chicken Pot Pie Casserole delivers tender chicken, soft vegetables, and flaky biscuits that soak up the sauce beautifully.
With its comforting aroma and rich flavor, this Best Chicken Pot Pie Casserole stands out thanks to the Dijon mustard and fresh thyme, which add depth without overpowering the classic profile. Once you make this Best Chicken Pot Pie Casserole, it will become your dependable, go-to comfort meal.
Ingredients
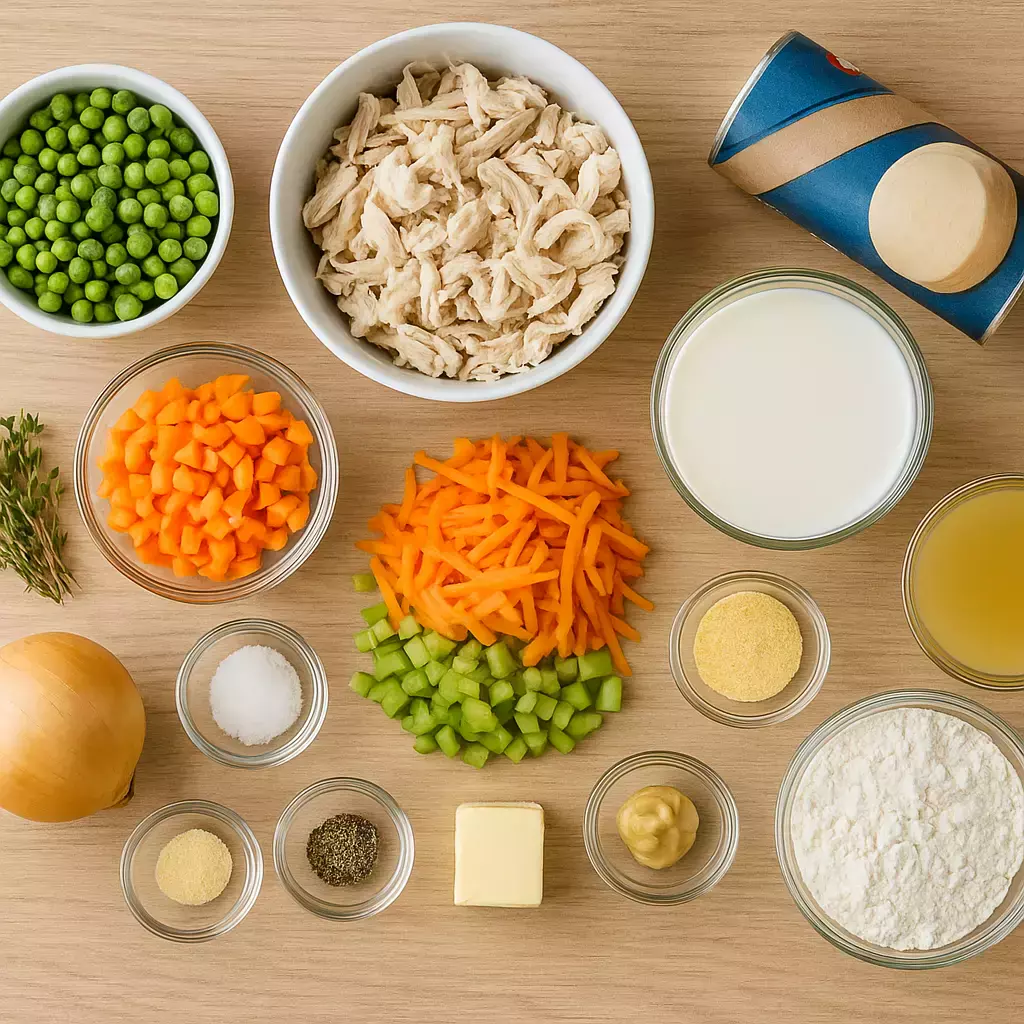
- 4 Tbsp butter
- 3 medium carrots, diced (about 1½ cups)
- 3 stalks celery, diced (about 1½ cups)
- 1 large yellow onion, diced (about 1½ cups)
- 1 tsp fresh thyme, chopped
- 1 tsp kosher salt, divided
- ½ tsp freshly ground black pepper
- 4 Tbsp all-purpose flour
- 2 cups whole milk
- 1 cup low-sodium chicken broth
- 1 Tbsp Dijon mustard
- ½ tsp garlic powder
- 4 cups cooked shredded chicken
- 1 cup frozen peas
- 1 (16.3-ounce) tube biscuit dough
- Optional but delicious: a pinch of smoked paprika, extra thyme, or a splash of cream for added richness.
How to Make the Best STEP-BY-STEP
- Preheat the oven. Set your oven to 400°F (200°C). Grease a 9×13-inch baking dish.
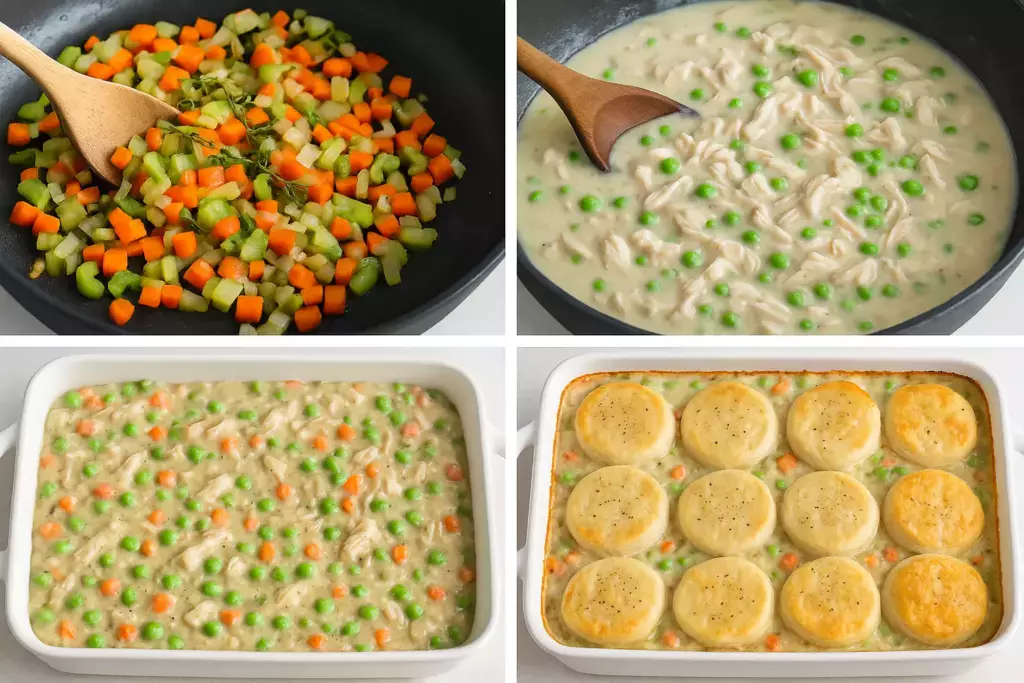
- Sauté the vegetables. In a large skillet over medium heat, melt the butter. Add diced carrots, celery, and onion with ½ teaspoon kosher salt and the black pepper. Cook, stirring occasionally, until the vegetables soften and the onions turn translucent, 7–9 minutes. Stir in the chopped thyme during the last minute to bloom the flavor.
- Make the roux. Sprinkle the flour over the vegetables. Stir constantly for 1–2 minutes to create a blond roux that removes the raw flour taste.
- Whisk in liquids. Slowly pour in the milk and chicken broth, whisking continuously to avoid lumps. Add the Dijon mustard and garlic powder. Bring to a gentle simmer. Cook 3–5 minutes, stirring, until the sauce thickens into a gravy that coats the back of a spoon.
- Season and add chicken. Taste and adjust with the remaining ½ teaspoon kosher salt if needed. Fold in the shredded chicken and frozen peas until evenly combined and warmed through.
- Transfer to the dish. Pour the creamy chicken mixture into the prepared baking dish and spread into an even layer.
- Add the biscuits. Open the tube of biscuit dough. For even baking and more surface area, cut each biscuit into quarters. Scatter the pieces evenly over the filling, leaving small gaps so steam can escape. For extra color, lightly brush the biscuit tops with milk or melted butter (optional).
- Bake. Place the dish on the center rack and bake 15–20 minutes, until the biscuits are puffed and deeply golden and the filling is bubbling around the edges. If the tops brown too quickly, tent loosely with foil for the last few minutes.
- Rest and serve. Let the casserole rest 5–10 minutes to set. Garnish with more thyme if you like, then scoop and serve hot.
Tip: For ultra-golden biscuits, start the bake on the lower-middle rack for the first 10 minutes, then move to the middle rack to finish.
Healthier Alternatives
- Lighten the sauce: Use 2% milk instead of whole milk and reduce butter to 2–3 Tbsp. Stir in ¼ cup plain Greek yogurt off heat for creaminess.
- Veggie boost: Add 1 cup diced mushrooms or 1 cup cauliflower florets with the mirepoix to increase volume and fiber.
- Lean chicken: Use mostly chicken breast or rotisserie breast meat to reduce fat.
- Whole-grain topper: Swap in whole-wheat biscuit dough for more fiber.
- Dairy-free: Use olive oil or vegan butter, unsweetened almond or oat milk, and thicken with 2 Tbsp cornstarch slurry added to the simmering broth.
- Gluten-free: Replace flour with a 1:1 gluten-free flour blend or 1½ Tbsp cornstarch and use a gluten-free biscuit dough or top with buttered, crumbled gluten-free crackers.
- Lower sodium: Choose low-sodium broth and adjust salt to taste at the end.
Serving Suggestions
- Fresh and crisp: Pair with a lemony arugula salad or simple mixed greens with vinaigrette to balance the richness.
- Vegetable sides: Roasted green beans, honey-glazed carrots, or garlicky sautéed kale.
- Comfort duo: Serve with cranberry sauce or a quick apple slaw for sweet-tart contrast.
- Flavor finish: Sprinkle with chopped parsley or chives, or add a pinch of flaky sea salt just before serving.
Storing Tips & Make Ahead & Freeze Tips
- Refrigerate: Cool completely, cover, and refrigerate up to 3–4 days. Reheat at 350°F (175°C) until hot and biscuits re-crisp (about 20 minutes). Microwaving softens biscuits; for best texture, reheat in the oven or an air fryer.
- Make ahead: Assemble the filling up to 2 days ahead and refrigerate. When ready to bake, warm the filling on the stove, transfer to the dish, add biscuit dough, and bake. Avoid topping with biscuits until just before baking to prevent sogginess.
- Freeze (unbaked): Assemble the filling in a freezer-safe dish, cool, cover tightly, and freeze up to 3 months. Add biscuits just before baking. Bake from frozen at 375°F (190°C), covered with foil for 30–35 minutes, then uncover, add biscuits, and bake 20–25 minutes more until golden and bubbling.
- Freeze (baked): Cool completely, wrap tightly, and freeze up to 2 months. Reheat covered at 350°F until hot, then uncover to re-crisp the biscuits.
Common Mistakes to Avoid
- Runny filling: Cook the roux long enough and simmer the sauce until it thickens before adding chicken and peas.
- Soggy biscuits: Don’t add biscuits to cold filling; warm filling helps them bake and brown. Leave small gaps for steam to escape.
- Lumpy sauce: Add milk and broth slowly while whisking; keep the heat moderate.
- Undercooked vegetables: Soften the carrots and celery before making the roux for a tender bite.
- Over-salting: Use low-sodium broth and adjust salt at the end after tasting.
- Skipping the rest: Let the casserole sit 5–10 minutes post-bake so the filling sets.
Final Tips & Conclusion
For the absolute best texture and flavor, give the vegetables time to soften, whisk the sauce patiently, and bake until the biscuits are deeply golden. Cutting biscuits into quarters ensures more crispy edges and fewer doughy centers. A touch of Dijon brings brightness and complexity without stealing the show.
When you want cozy made simple, this Best Chicken Pot Pie Casserole delivers every time—creamy, hearty, and ready to satisfy. If you love savory bakes, be sure to check out our Best Cheese Leek and Smoked Beef Pie Recipe for another comforting, flavor-packed dinner idea.
Craving something sweet next? Try our Olympic Chocolate Muffins Recipe — rich, double-chocolate perfection.
Need a bright morning idea? Don’t miss our Pitaya Smoothie Bowl — fruity, vibrant, and full of energy.
For safe reheating and storage tips, check the USDA’s official food safety guide.
More Cozy Recipes from Quickoria
- Best Pitaya Smoothie Bowl Recipe Quick And Vibrant
- Easy Overnight Oats – Creamy, Healthy & Irresistibly Good
Can I use cream of chicken soup instead of making the sauce?
Yes! Replace the flour, milk, and broth mixture with one can of cream of chicken soup and ½ cup milk. It gives the casserole a rich, creamy shortcut flavor with less prep time.
Can I use puff pastry instead of biscuits?
Absolutely. Swap the biscuit dough for one sheet of puff pastry. Brush it with a little egg wash before baking to get a golden, flaky crust that looks bakery-perfect.
Can I make this chicken pot pie casserole ahead of time?
Yes — assemble the casserole (without baking), cover tightly, and refrigerate up to 24 hours. Bake when ready, adding a few extra minutes to the cooking time.
Can I freeze chicken pot pie casserole?
Definitely! Cool completely, then wrap tightly in foil and freeze for up to 2 months. Reheat at 350°F until warmed through. It’s a great freezer-friendly comfort meal.
Can I make it without biscuits or crust?
Of course. Skip the topping and serve the creamy chicken filling over rice, mashed potatoes, or puff pastry shells for a lighter version.
How long does it take to bake chicken pot pie casserole?
Bake at 375°F (190°C) for 22–25 minutes, or until the biscuits are golden brown and the filling is bubbling at the edges.
Ingredients
Instructions
- 1Preheat the oven. Set your oven to 400°F (200°C). Grease a 9×13-inch baking dish.
- 2Sauté the vegetables. In a large skillet over medium heat, melt the butter. Add diced carrots, celery, and onion with ½ teaspoon kosher salt and the black pepper. Cook, stirring occasionally, until the vegetables soften and the onions turn translucent, 7–9 minutes. Stir in the chopped thyme during the last minute to bloom the flavor.
- 3Make the roux. Sprinkle the flour over the vegetables. Stir constantly for 1–2 minutes to create a blond roux that removes the raw flour taste.
- 4Whisk in liquids. Slowly pour in the milk and chicken broth, whisking continuously to avoid lumps. Add the Dijon mustard and garlic powder. Bring to a gentle simmer. Cook 3–5 minutes, stirring, until the sauce thickens into a gravy that coats the back of a spoon.
- 5Season and add chicken. Taste and adjust with the remaining ½ teaspoon kosher salt if needed. Fold in the shredded chicken and frozen peas until evenly combined and warmed through.
- 6Transfer to the dish. Pour the creamy chicken mixture into the prepared baking dish and spread into an even layer.
- 7Add the biscuits. Open the tube of biscuit dough. For even baking and more surface area, cut each biscuit into quarters. Scatter the pieces evenly over the filling, leaving small gaps so steam can escape. For extra color, lightly brush the biscuit tops with milk or melted butter (optional).
- 8Bake. Place the dish on the center rack and bake 15–20 minutes, until the biscuits are puffed and deeply golden and the filling is bubbling around the edges. If the tops brown too quickly, tent loosely with foil for the last few minutes.
- 9Rest and serve. Let the casserole rest 5–10 minutes to set. Garnish with more thyme if you like, then scoop and serve hot.